Monday, December 5, 2016

Blog Post #6 - Colored Pencil Project


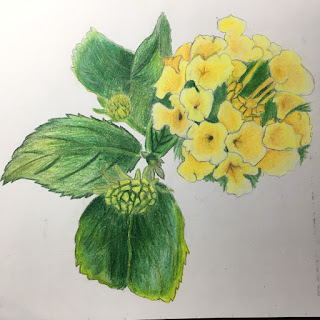
This is the picture I used for my project. I took it at Corte Madera town park near the Corte Madera post office. I chose it because it was challenging but it had good lighting and it had a lot of detail which I liked it. I kept myself challenged by choosing this picture in general, it was something I had never done before but wanted to try.

I chose this composition because I thought it framed the flowers well and had a good color scheme. I chose to use a grid to draw this project because it had a lot of detail in it and I thought it would be hard to get correct proportions with using just my observational drawing skills. Something that was really challenging for me in this project was getting the flower shapes correct and getting the coloring correct. I didn't have much time to color in class so I ended up taking the drawing home and I hadn't brought home the right yellows that I wanted to use so it made it more difficult because I had to use colored pencils that were a bit difficult to work with. Something that I found really successful in this drawing was the shading on the leaves that I did, I love the lighting on them and I think they really look like leaves. For this project I used an analogous color scheme. I feel like this picture looks as if it was early in the morning. To help my colors blend in the flower and the leaves I used the colorless blender. In this drawing I also used the rule of odds putting 5 leaves in and putting three flower buds. Something I would have done differently for this project is I would have taken more time at home to work on coloring the background as well as putting in more detail. I would have also if I could have, I would have chosen a different picture because I think that this picture was really hard to work with for the level of experience with drawing I have. Other than that I am very happy with how my project turned out.

Monday, November 7, 2016

Blog Post #5 - Shading Project at Home ( Sorry again for no pictures D: )


At home I decided to draw my metal ruler on top of my dark wooden desk. I chose this because I thought that it would be challenging and interesting to draw the metal and then the grain of the wood. During this drawing I did find it really challenging to draw the grain of the wood because my desk is so dark it was hard to see the texture of it but, I think that it had a really nice contrast to my ruler which was a lighter color. Another difficult part of this was the light shine on the desk.
For this drawing I had my desk lamp shine down onto my desk and then reflect to the ruler. I did this because I wanted the lighting to be interesting but I also wanted it to be off of the ruler so you could see the measurement lines.
I think that it was easier to draw at home because then I could listen to the music on my phone which helps a lot and it was also quieter and I didn't feel like I had to rush through my drawing. I could take as much time as I wanted to when I wanted to, I didn't have a time limit or a time amount that I had to work on this. In all I am very happy with how my work turned out, I don't think I would have changed anything.

Blog Post #4 - Post Shading Project ( Didn't have pictures, sorry... D: )

       Since blog post #3 I don't think that I have shown improvement in my art, it was hard to add more detail in my drawings and cast shadow drawings are more difficult than I thought they could be. In all it was difficult but I may have gotten a little bit better.
       I think that the first drawing I did, the paint brush one turned out the best.  I think that it had the best detail but I think I could have worked on the cast shadow a bit more.  I think that the paint splatters and the brush bristles were the best part of that drawing but I still think I could have done a bit more with the shading and the paint splatters on the metal of the brush.  
In these projects the most difficult part has been the shading. In the future I think I should spend a bit more time on the shading rather than the basic shape of the object I'm drawing because I feel like I spent most of my time changing the shape of the actual drawing itself rather than working on more important things like shading and detail.
In this past week or two I learned that shading and detail are very important to a drawing. Instead of trying to make the shape perfect have people use their imaginations instead and work on the more important parts of the drawing like the details or shading. They are very important to a drawing because it makes the drawing look more 3D and less like a drawing, more like the actual object. They also help the drawing look like a picture rather than a drawing if thats what you're looking for.

Blog Post #3 - First Drawing and Shading Practice.

Final Drawing

Final Drawing Sketches

First Shading Worksheet


My first shading worksheet (to the right) was really fun for me. I have had some experience shading but I think this helped a lot. One thing that really helped me make the blends were the eraser and the side of the pencil. The eraser helped because it helped me smooth out the shading and the side of the pencil helped a lot because it made it so it looked like actual shading, not just multiple lines put together so that it looked darker. Although the eraser did help, something that I still struggle with in shading is blending the pencil so that it doesn't look as blocky.
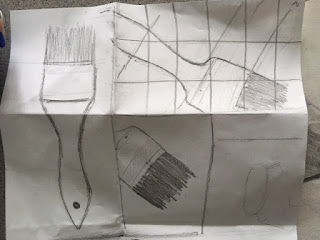
       In my final drawing I decided to draw a paint brush.  I chose to draw it so that the paintbrush was slightly going off the page in two different places at an angle; the top and the right side of the paper.  I chose this composition because I think it really made the paintbrush look interesting and it was an unusual way to draw a paintbrush.  I chose it also because it followed the rule of thirds, I made it an open composition, its not symmetrical, and it followed the rule of odds.  Before I started to contour it I drew the basic shapes of the paintbrush, the wood, the metal that connects to the wood and then the bristles.  After that I started to draw the basics of the bristles and the bigger details in the metal of the paintbrush.  After that I started to draw the different paint splatters on the handle and metal of the brush.  At the end I worked with the shading.  The hardest part about this drawing I think, was the shading.  Having all of the paint splatters on the handle along with the different textures of the wood the metal and the bristles I don't think this was a good idea to draw first.  
Something that I want to improve in my final project is more detail within the shading. I also want to incorporate a better cast shadow and more detail in general in the wood and the metal.

Tuesday, September 27, 2016

Blog Post #2 - Final Shoe Drawing

     For this drawing I had many different steps and I used many different techniques.  For the steps I drew a rough draft of the shoe; (the one in the other blog post) and, then I started to draw the basic shape of my shoe which ended up looking like an upside down ice cream cone with both edges being rounded.  After I drew my weird ice cream cone shape I sighted my shoe to look at the proportions.  At first I drew the front of the side of the shoe out of proportion on purpose because I didn't like how it looked, but after a while I changed it so it looked correct and now I see that it looks a lot better.  After I finished drawing my shoe and when I knew where the light source was I decided to shade my shoe in pencil before I started drawing in pen that way I would know where to shade darker and where to shade lighter and that way it would be harder for me to mess up.  When I started to shade I shaded in the direction of the curve of the shoe and I started on the left side where it was the darkest;  I worked my way around the whole shoe and left the front toe of the shoe and the foot hole for last.  I worked on the foot hole shading first and then I moved on to the toe.  
     One of the biggest problems I had while drawing my shoe was proportion and very specific detail like the curve of the front of the shoe, the shoe laces, and the curves of the side of the shoe.  To overcome this problem I asked my friends what I should do, they gave me some options and I chose from there, they also helped me by showing me a better way to draw some elements like, the laces.  
     This project was challenging but only in some parts.  The shading was pretty simple for me, but drawing the laces was one of the harder parts for me.  For one, they changed shape every class so it was hard to keep the same reference.
     I'm really happy about how this project turned out!  I think that the shading turned out AMAZING and I'm really proud of that.  I also think that the shape of the shoe and the proportions turned out really well.   This is probably the best thing I've ever drawn to be completely honest, but saying that I realize that its also the longest I've ever spent on an art project.
     Something that I would change about this project is the part where we had to shade in pen.  Personally I've never shaded in pen and it wasn't my favorite,  it turned out well but I'd rather shade in pencil.  During this project I learned to always draw with the right proportions no matter what and to always try new things, like shading in pen!

Wednesday, September 14, 2016

Blog Post #1 - Shoe Practice Drawings


To start this project, I started by sighting it (obviously) and then I drew two lines.  The height of the shoe and the length, just so I could have the general idea of the size of the shoe.  When I was done with that part of the shoe I started to draw the basic shapes.  For the shoe drawing of it facing me I drew a sort of ice cream cone shape so I could get the angle right.  For the other shoe I started with a kind of deformed rectangle.  From there I started to draw the curves of the front, back and sides of the shoe.  Then I drew the different parts of the shoe, the mouth and the front of the shoe.  I finished with the laces, their holes and the wrinkles.

The sighting technique is important because if the hole of your shoe takes up half of the shoe in the drawing but 1/3 of the shoe in real life then you wont have enough room for the rest of the shoe.

The most challenging part of drawing my shoe was probably getting the shape right of the toe and the back of the shoe.  Another challenging part for me was doing the laces.

I think that my overall drawing performance of drawing has improved during this drawing, but mostly being able to get the proportions right.

The only thing I'm worried about in my final drawing of my shoe is the angle.